- Cài đặt iRedMail sau proxy server
- Chứng chỉ SSL để gời mail internet
- Thêm Adminer
- Thêm Rainloop
- iRedMail script
- Dùng subdomain
- Sửa lỗi password plugin của Roundcube
- Thay đổi kiểu mã hóa mật khẩu
- Gởi mail qua relay host
- Master user
- Mail server cho nhiều domain
- Auto config – auto discover
iRedMail sau proxy server
Ở proxy server, thêm vào cấu hình nginx
upstream backend {
  server local_ip_of_backend:443;
}
server {
  listen              443 ssl;
  server_name         mail.example.com;
  ssl_certificate     /etc/letsencrypt/live/mail.example.com/fullchain.pem;
  ssl_certificate_key /etc/letsencrypt/live/mail.example.com/privkey.pem;
# ssl_dhparam         /etc/letsencrypt/dhparams-2048.pem;

  add_header Strict-Transport-Security "max-age=15552000; includeSubdomains";
  ssl_protocols       TLSv1.2 TLSv1.3;
  ssl_ciphers         HIGH:!aNULL:!MD5;
  ssl_prefer_server_ciphers     on;
  ssl_session_cache   shared:SSL:10m;
  proxy_buffering     off;

  location / {
    proxy_pass  https://local_ip_of_backend;
    proxy_set_header Host $host;
    proxy_http_version 1.1;
    proxy_set_header X-Forwarded-For $proxy_add_x_forwarded_for;
    proxy_set_header Upgrade $http_upgrade;
    proxy_set_header Connection $connection_upgrade;
  }
}
iRedMail buộc phải dùng https từ khai báo trong file /etc/nginx/templates/hsts.tmpl
add_header Strict-Transport-Security "max-age=31536000";Ở backend, giữ nguyên cài đặt nginx của iRedMail
Chứng chỉ SSL
iRedMail tạo sẳn chứng chỉ SSL nhưng chỉ dùng nội bộ, không thể gởi mail internet. Vì vậy cần cài đặt certbot và tạo chứng chỉ SSL cho mail.example.com. Xong thay thế các chứng chỉ iRedMail:
ln -sf /etc/letsencrypt/live/mail.example.com/fullchain.pem /etc/ssl/certs/iRedMail.crt
ln -sf /etc/letsencrypt/live/mail.example.com/privkey.pem /etc/ssl/private/iRedMail.key
Khởi động lại postfix và dovecot
systemctl restart postfix dovecotThêm adminer
Ở /etc/nginx/templates/adminer.tmpl có hướng dẫn cài đặt adminer. Tuy nhiên adminer có phiên bản 1 file duy nhất đặt ở đâu cũng được, chỉ cần sửa trong adminer.tmpl
# /opt/www/adminer/latest.php;
/path/to/adminer/latest.php;
Sau đó thêm vào /etc/nginx/sites-enabled/00-default-ssl.conf
include ...
include /etc/nginx/templates/adminer.tmpl;
include ...
Khởi động lại nginx
systemctl nginx restartThêm Rainloop
Rainloop là email client hiện đại, nhanh chóng trên nền web, cho phép khai báo nhiều tài khoản email để có thể chuyển qua lại dễ dàng.
iRedMail script
iRedMail admin quá đơn giản, chỉ có mỗi thêm bớt domain/user. Các thao tác về alias, forwarding… đều không có. Có thể dùng câu lệnh MySql thay thế. iRedMail Script giúp làm việc này, tuy nhiên đây chỉ là các câu sql cần thiết phải chạy qua mysql. Cần chỉnh sửa đôi chút để có thể gọi thực thi câu lệnh sql.
# list-active-account.sh
printf "select username FROM mailbox WHERE active = 1 ORDER BY domain,username; \n"

# sửa thành
sql="select username FROM mailbox WHERE active = 1 ORDER BY domain,username;"
mysql --table vmail <<< $sql
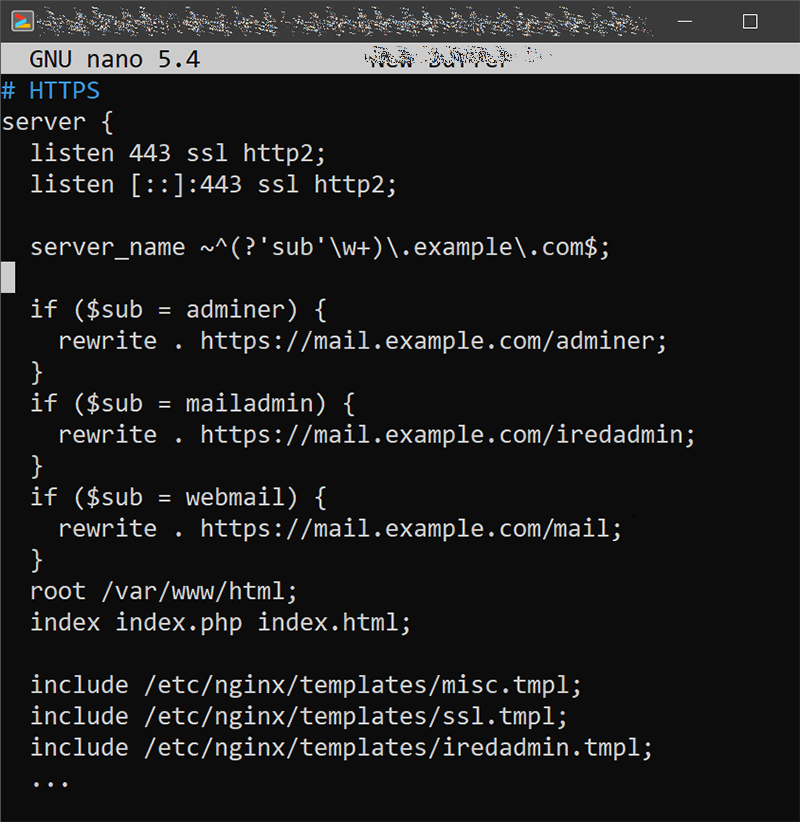
Dùng subdomain
Chúng ta sẽ chuyển hướng các subdomain như sau:
- webmail.example.com => mail.example.com/mail
- adminer.example.com => mail.example.com/adminer
- mailadmin.example.com => mail.example.com/iredadmin
Sửa /etc/nginx/sites-enabled/00-default-ssl.conf

Từ dòng root trở về sau giữ nguyên như thiết lập của iRedMail.
Tuy nhiên if trong Nginx dễ gây rắc rối và chậm, có thể dùng cách map biến của Nginx
Sửa lỗi password plugin của Roundcube không hoạt động
Xem bài trước
Tuy nhiên có thể mã hóa kiểu SSHA512 mà không dùng doveadm như sau:

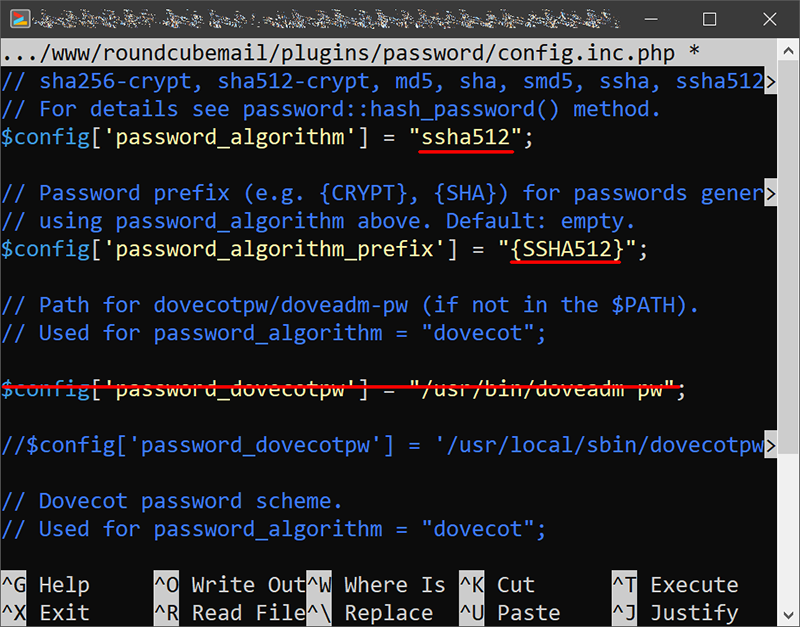
Thay đổi kiểu mã hóa mật khẩu
Trong khi Roundcube chấp nhận các kiểu mã hóa mới nhất thì iRedMail dừng lại ở SSHA512. Vì vậy nếu thay đổi kiểu mã hóa mới hơn ở Roundcube thì iRedMail không hiểu.
Các file khai báo kiểu mã hóa:
/opt/www/iredadmin/libs/default_settings.py
/opt/www/roundcubemail/plugins/password/config.inc.php
Gởi email qua relayhost
CSDL vmail có bảng sender_relayhost (id, account, relayhost).
1. Chúng ta thêm vào 2 cột auth và active
mysql -h localhost vmail -e "ALTER TABLE sender_relayhost ADD COLUMN auth varchar(255) NOT null, ADD COLUMN active tinyint(1) DEFAULT 0;"2. Thêm dữ liệu về relayhost tương tự như sau

Trong đó usr@gmail.com là tài khoản gởi email của gmail có mật khẩu là password.
3. Sửa và tạo thêm file đọc bảng sender_relayhost
## Sửa /etc/postfix/mysql/sender_dependent_relayhost_maps.cf
...
query = SELECT relayhost \
        FROM sender_relayhost \
        WHERE account='%s' AND active=1 LIMIT 1

## Thêm /etc/postfix/mysql/sender_dependent_relayhost_auth.cf
cp /etc/postfix/mysql/sender_dependent_relayhost_maps.cf /etc/postfix/mysql/sender_dependent_relayhost_auth.cf

## Sửa /etc/postfix/mysql/sender_dependent_relayhost_auth.cf
...
query = SELECT auth \
        FROM sender_relayhost \
        WHERE relayhost='%s' AND active=1 LIMIT 1
4. Sửa khai báo trong /etc/postfix/main.cf
proxy_read_maps = ... $smtp_sasl_password_maps
sender_dependent_relayhost_maps = proxy:mysql:/etc/postfix/mysql/sender_dependent_relayhost_maps.cf
5. Thêm vào cuối file /etc/postfix/main.cf
cat<<EOF>>/etc/postfix/main.cf
# outbound relay configurations
smtp_sasl_auth_enable = yes
smtp_sender_dependent_authentication = yes
smtp_sasl_password_maps = proxy:mysql:/etc/postfix/mysql/sender_dependent_relayhost_auth.cf
smtp_sasl_security_options = noanonymous
smtp_tls_security_level = may
header_size_limit = 4096000
EOF
6. Khởi động lại postfix
systemctl restart postfixMaster user
Dovecot cho phép tạo master user, người có thể đăng nhập vào tài khoản email bất kỳ mà không cần có mật khẩu của email.
# Chọn username với domain không tồn tại
usr=abc@nothing.org
pwd=$(doveadm pw -s SSHA512 -p m@stErPwd)
echo "$usr:$pwd" > /etc/dovecot/dovecot-master-users

# Khởi động lại dovecot
systemctl restart dovecot

# Đăng nhập account user@domain.name như sau:
username: user@domain.name*abc@nothing.org
password: m@stErPwd
Ứng dụng: thí dụ như dùng imapsync để backup về Gmail
